How I developed my first gnome-shell extension
You can also be interested in:
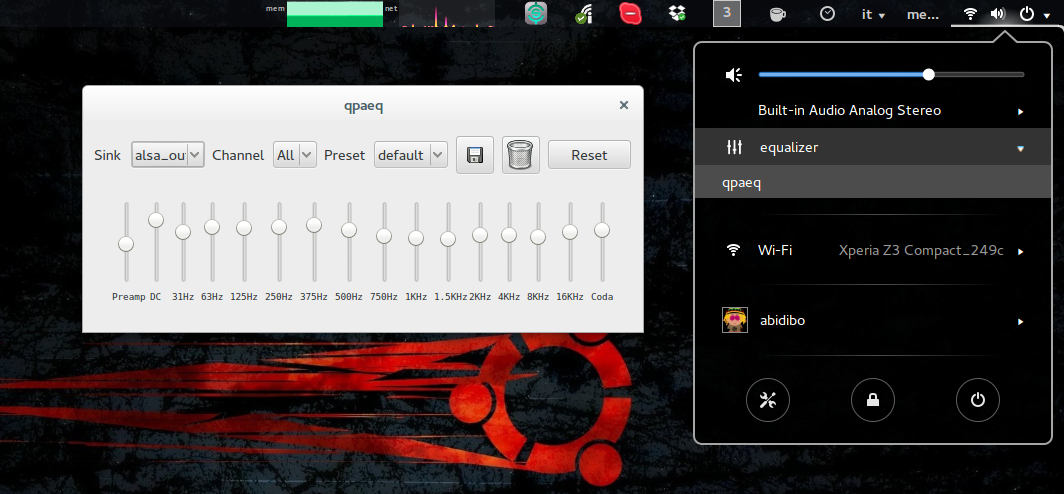
Recently I installed qpaeq as a system wide mixer on my ubuntu 14.04 machine. Now I want a way to launch it from the status bar, so I began looking for a way to create a simple gnome-extension. Lucky me, the extensions are written in js, unfortunately the documentation is not so good.
A good starting point is this excellent post (a bit outdated, not all scripts presented work).
Let's proceed by steps.
Create a boilerplate project
We can use the gnome-shell-extension-tool to start a new project:
$ gnome-shell-extension-tool --create-extension
The tool will ask us to provide some mandatory information:
- the name of the tool: something like "My Extension FTW"
- a brief description: something like "This is an awesome extension doing this and that"
- an unique identifier for the extension: for example "gnome-shell-my-extension-ftw@abidibo"
Done! Now your favourite editor should open showing you the "extension.js" file content, which is the core of your application code.
This is a working "Hello World" extension which will display a gears icon on the top bar which when clicked will display an "Hello World" message in the center of the screen.
Wait! How to enable it?
Googling a bit you will find that you can enable it following this steps:
- alt-F2 -> r -> enter
- open gnome-tweak-tool and enable it in the extensions tab
Well, actually in my case it didn't work, so I switched back to use a terminal and the gsettings command; in a terminal (lines starting with // are comments)
// which extensions are enabled?
$ gsettings get org.gnome.shell enabled-extensions
// my output was something like
['workspace-indicator@gnome-shell-extensions.gcampax.github.com', 'workspace-grid@mathematical.coffee.gmail.com', 'activities-config@nls1729', 'drop-down-terminal@gs-extensions.zzrough.org', 'CoverflowAltTab@palatis.blogspot.com', 'caffeine@patapon.info', 'RecentItems@bananenfisch.net', 'Move_Clock@rmy.pobox.com', 'alternate-tab@gnome-shell-extensions.gcampax.github.com', 'todo.txt@bart.libert.gmail.com', 'auto-move-windows@gnome-shell-extensions.gcampax.github.com', 'topIcons@adel.gadllah@gmail.com', 'system-monitor@paradoxxx.zero.gmail.com', 'audio-output-switcher@anduchs', 'gnome-shell-audio-output-switcher@kgaut', 'gnome-shell-qpaeq-launcher@abidibo']
// let's enable the new extension: copy the previous output, add the new created extension and use set instead of get
$ gsettings set org.gnome.shell enabled-extensions "['workspace-indicator@gnome-shell-extensions.gcampax.github.com', 'workspace-grid@mathematical.coffee.gmail.com', 'activities-config@nls1729', 'drop-down-terminal@gs-extensions.zzrough.org', 'CoverflowAltTab@palatis.blogspot.com', 'caffeine@patapon.info', 'RecentItems@bananenfisch.net', 'Move_Clock@rmy.pobox.com', 'alternate-tab@gnome-shell-extensions.gcampax.github.com', 'todo.txt@bart.libert.gmail.com', 'auto-move-windows@gnome-shell-extensions.gcampax.github.com', 'topIcons@adel.gadllah@gmail.com', 'system-monitor@paradoxxx.zero.gmail.com', 'audio-output-switcher@anduchs', 'gnome-shell-audio-output-switcher@kgaut', 'gnome-shell-qpaeq-launcher@abidibo', 'gnome-shell-my-extension-ftw@abidibo']"
Ok, now the extension is enabled, reload gnome in order to see it: alt-F2, then r and ENTER. Now you should see the gears icon in the top bar, click it to show the "Hello World" message.
And then just start from here. Edit the "extension.js" file to create your custom extension. To test it just reload gnome-shell.
Ok but, code reference?
This is actually a shit. It seems difficult if not impossible to find out good reference about javascript objects available to import in your extension. Every search lead me to a Clutter tutorial or some external module reference.
But finally I found something useful, I recommend you to read this and this.
And then just surf all the code inside /usr/share/gnome-shell/ and search for similar functionality you desire to implement.
Debugging and watch for errors
You can use the Looking Glass tool (alt-F2, lg ENTER), or gjs-console from the command line.
How I developed the extension
I've done nothing awesome, and I've really just written a super simple extension to fit my needs, but maybe of some interest for any unexperienced programmer which starts its trip in the world of the gnome extensions. Here I describe what I've done and how I got over some obstacles.

The extension simply consist in a icon+label menu voice, which has a submenu (maybe I'll install other equalizers in the future). The first submenu voice is "qpaeq", and when clicked it launches the qaepq equalizer application.
First: start from a similar extension, if you can
The Hello World boilerplate extension was not exactly similar to what I had in mind. In particular I wanted to add a menu voice below the volume slider. So I had to add voices to the status panel. Fortunately there is this extension: https://github.com/kgaut/gnome-shell-audio-output-switcher which does something similar, so I started from there. I just copied and pasted the whole extension.js file content.
Use custom icons
I wanted to add a menu voice similar to the volume slider one, with an icon and then a text in place of the slider. I saw that in the Hello World example the icon is created this way:
let icon = new St.Icon({ icon_name: 'system-run-symbolic',
                         style_class: 'system-status-icon' });
But how to add it to our menu voice?
The volume controller has an icon, so I began digging into the js code which produces the volume controller. First, if you look the extension I took as a starting point, you'll see that in the enable function there is the code which actually inserts the new menu voice in the existing panel:
function enable() {
	if (audioOutputSubMenu != null)
		return;
	audioOutputSubMenu = new AudioOutputSubMenu();

	//Try to add the output-switcher right below the output slider...
	let volMen = Main.panel.statusArea.aggregateMenu._volume._volumeMenu;
	let items = volMen._getMenuItems();
	let i = 0;
	while (i < items.length)
		if (items[i] === volMen._output.item)
			break;
		else
			i++;
	volMen.addMenuItem(audioOutputSubMenu, i+1);
}
So, easy enough, I searched for:
$ cd /usr/share/gnome-shell/js/ui/
$ grep -lRi "statusArea"
And I found that something usefull could stay inside
/usr/share/gnome-shell/js/ui/panel.js
In particular this portion of code:
const AggregateMenu = new Lang.Class({
    Name: 'AggregateMenu',
    Extends: PanelMenu.Button,

    _init: function() {
        this.parent(0.0, _("Settings"), false);
        this.menu.actor.add_style_class_name('aggregate-menu');

        this._indicators = new St.BoxLayout({ style_class: 'panel-status-indicators-box' });
        this.actor.add_child(this._indicators);

        this._network = new imports.ui.status.network.NMApplet();
        if (Config.HAVE_BLUETOOTH) {
            this._bluetooth = new imports.ui.status.bluetooth.Indicator();
        } else {
            this._bluetooth = null;
        }

        this._power = new imports.ui.status.power.Indicator();
        this._rfkill = new imports.ui.status.rfkill.Indicator();
        this._volume = new imports.ui.status.volume.Indicator();
        this._system = new imports.ui.status.system.Indicator();
        this._screencast = new imports.ui.status.screencast.Indicator();

        this._indicators.add_child(this._screencast.indicators);
        this._indicators.add_child(this._network.indicators);
        if (this._bluetooth) {
            this._indicators.add_child(this._bluetooth.indicators);
        }
        this._indicators.add_child(this._rfkill.indicators);
        this._indicators.add_child(this._volume.indicators);
        this._indicators.add_child(this._power.indicators);
        this._indicators.add_child(PopupMenu.unicodeArrow(St.Side.BOTTOM));

        this.menu.addMenuItem(this._volume.menu);
        this.menu.addMenuItem(new PopupMenu.PopupSeparatorMenuItem());
        this.menu.addMenuItem(this._network.menu);
        if (this._bluetooth) {
            this.menu.addMenuItem(this._bluetooth.menu);
        }
        this.menu.addMenuItem(this._rfkill.menu);
        this.menu.addMenuItem(this._power.menu);
        this.menu.addMenuItem(new PopupMenu.PopupSeparatorMenuItem());
        this.menu.addMenuItem(this._system.menu);
    },
});
Here is quite obvious that all the panel voices are constructed in order to display the panel. And we see that the items are instances of "Indicator" constructors:
//...
this._volume = new imports.ui.status.volume.Indicator();
this._system = new imports.ui.status.system.Indicator();
//...
So I started looking inside
/usr/share/gnome-shell/js/ui/status/volume.js
/usr/share/gnome-shell/js/ui/status/system.js
and I've discovered that objects of type "PopupMenu.PopupSubMenuMenuItem" have an "icon" and a "label" property, just waiting to be set.
...
// line 974 of /usr/share/gnome-shell/js/ui/popup.Menu.js
this.icon = new St.Icon({ style_class: 'popup-menu-icon' });
...
The name property.
But which icons are supported?
$ cd /usr/share/icons && find ./ -name *system-run-symbolic*
// response: ./gnome/scalable/actions/system-run-symbolic.svg
It seems all gnome system icons. There were no icons I liked , so I decided to use a custom one. But how? Undoubtedly a path must be set anywhere, but initially I couldn't find how, since all core stuff uses (I think) system icons.
Here comes gnome-shell-extension-caffeine, an extension I had installed which has a custom icon. So I looked into the source of this extension and I found that in order to add a search path the the theme, you can do it inside the init method of the extension:
// extensionMeta is the object obtained from the metadata.json file, plus
// the path property which is the path of the extension folder!
function init(extensionMeta) {
    let theme = imports.gi.Gtk.IconTheme.get_default();
    theme.append_search_path(extensionMeta.path + "/icons");
}
Then I just added an "icons" folder inside my project root, saved a 16x16 svg icon inside it and referenced it by its file name.
Launch a shell command when clicking the menu voice
It was almost done, only I needed a way to attach an event to the menu voice (and here I've taken the code from the "Log Out" voice):
// inside /usr/share/gnome-shell/js/ui/status/system.js, line 319
item = new PopupMenu.PopupMenuItem(_("Log Out"));
item.connect('activate', Lang.bind(this, this._onQuitSessionActivate));
So the event is called "activate", and in order to register a callback the "connect" function is used. Quite straightforward.
And last thing: How to launch a terminal command in such callback? Here the answer was simpler, or easier to find, just googling "launch shell command gnome extension", I found this, and I was ready to go.
And here comes the whole code of my extension:
/**
 * gnome-shell-qpaeq-launcher
 * Adds a equalizer menu voice to the gnome system panel under the volume controller,
 * which has a submenu, whose first voice 'qaepq' opens the qaepq equalizer when clicked
 */
const Lang = imports.lang;
const Main = imports.ui.main;
const PopupMenu = imports.ui.popupMenu;
const Util = imports.misc.util;

const EqualizerIcon = 'equalizer-symbolic';

const QpaeqSubMenu = new Lang.Class({
    Name: 'QpaeqSubMenu',
    Extends: PopupMenu.PopupSubMenuMenuItem,

    // constructor
    _init: function() {
        // instantiates the parent
        this.parent('qpaeq launcher: loading...', true);
        // icon and label
        this.icon.style_class = 'system-status-icon';
        this.icon.icon_name = EqualizerIcon;
        this.label.set_text("equalizer");
        // submenu item
        this.item = new PopupMenu.PopupMenuItem('qpaeq');
        this.item.connect('activate', Lang.bind(this, this._launch));
        // add it to the menu voice
        this.menu.addMenuItem(this.item);
    },
    /**
     * Launches the qaepq application
     */
    _launch: function() {
        Util.spawn(['qpaeq'])
    },

    destroy: function() {
        this.parent();
    }
});

let qpaeqSubMenu = null;

/**
 * Called when the extension is initialized
 */
function init(extensionMeta) {
    // add icons path to the theme search path
    let theme = imports.gi.Gtk.IconTheme.get_default();
    theme.append_search_path(extensionMeta.path + "/icons");
}

/**
 * Called when the extension is enabled
 * Instantiates the QpaeqSubMenu Class and inserts the new menu voice
 * below the volume controller
 */
function enable() {
    if (qpaeqSubMenu != null)
        return;
    qpaeqSubMenu = new QpaeqSubMenu();

    // Try to add the output-switcher right below the output slider...
    let volMen = Main.panel.statusArea.aggregateMenu._volume._volumeMenu;
    let items = volMen._getMenuItems();
    let i = 0;
    while (i < items.length)
        if (items[i] === volMen._output.item)
            break;
        else
            i++;
    volMen.addMenuItem(qpaeqSubMenu, i+1);
}

/**
 * Called when the extension is disabled
 */
function disable() {
    qpaeqSubMenu.destroy();
    qpaeqSubMenu = null;
}
Resources
- https://wiki.gnome.org/Projects/GnomeShell/Development
- https://wiki.gnome.org/action/show/Projects/Gjs?action=show&redirect=Gjs
- http://mathematicalcoffee.blogspot.it/2012/09/gnome-shell-extensions-getting-started.html
- http://mathematicalcoffee.blogspot.it/2012/09/gnome-shell-javascript-source.html
- https://github.com/eonpatapon/gnome-shell-extension-caffeine
- https://github.com/kgaut/gnome-shell-audio-output-switcher
Your Smartwatch Loves Tasker!

Your Smartwatch Loves Tasker!
Featured

Django admin and bootstrap 5
Bootstrap 5 has come, currently in beta release, and seems already very stable.
So the question is: are you looking for ...

About code optimization, learn from exercises
Let's see an example of exercise you can face during a job interview, and let's use it to understand some ...

Notes on the Pearson correlation coefficient
The Pearson correlation coefficient is a measure of the linear correlation between two variables X and Y. It has a ...
Archive
- 2021
- 2020
- 2019
- 2018
- 2017
- Nov
- Oct
- Aug
- Jun
- Mar
- Feb
- 2016
- Oct
- Jun
- May
- Apr
- Mar
- Feb
- Jan
- 2015
- Nov
- Oct
- Aug
- Apr
- Mar
- Feb
- Jan
- 2014
- Sep
- Jul
- May
- Apr
- Mar
- Feb
- Jan
- 2013
- Nov
- Oct
- Sep
- Aug
- Jul
- Jun
- May
- Apr
- Mar
- Feb
- Jan
- 2012
- Dec
- Nov
- Oct
- Aug
- Jul
- Jun
- May
- Apr
- Jan
- 2011
- Dec
- Nov
- Oct
- Sep
- Aug
- Jul
- Jun
- May

