Playing with tideSDK, create a brightness controller for fluxbox
You can also be interested in:

My ubuntu machine running fluxbox has all the features I desire. I've set up all kinds of short-cuts, menu and so on..., I've written my scripts to toggle between the notebook LCD and external monitors and I'm very happy with it. One thing more which I wanted was a brigthness control widget, but at the same time I disliked to install gnome or kde packages, and I could live simply with xbacklight and its get and set options. So what I needed is a simple interface to controll the xbacklight command.
And here comes tideSDK. After some reading about xlib and watching some examples I understood that now I don't have enough time to dive into it, so I decided to use an html5, js, css3 approach.
I must say that I don't like such approach very much, expecially because all these SDK seems to me very very buggy, full of inconsistencies and with poor performance, well maybe things have changed but my previous experience with appcelerator had been simply horrible.
But within an hour I was able to develop my Brightness Controller widget, and here I'll write how.
Get started with TideSDK
The first step was to download the SDK, then the Developer App and finally the Hello World example application. I followed the Getting Started guide and I must say that all worked as expected.
Start a new project
So after checking my installation I started a new project, the project's details are shown in the following image.
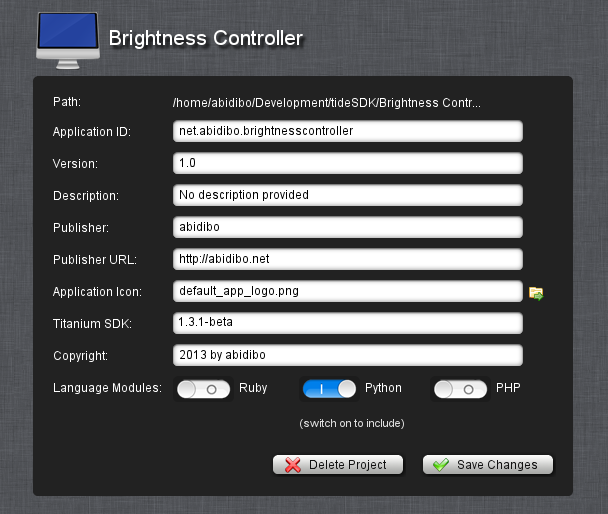
i've checked the python support because I need to make a system call to the command xbacklight and I prefer python over php.
The main app file
After creating the project you will find a base project structure inside the application folder path. And if you try to launch the application you'll see that it runs, it opens a window with a default text which now I can't remember.
Then the next step is to edit the main application file: Resources/index.html. Here comes my code:
<html>

  <head>

    <link rel="stylesheet" type="text/css" href="app://css/app.css" />

    <script src="app://js/mootools-core-yc.js"></script>

    <script src="app://js/mootools-more-yc.js"></script>

  </head>

  <body>

    <h1>Brightness Controller</h1>

    <div id="ctrl" class="slider">

      <div class="knob"></div>

    </div>

    <p id="show_value"></p>

    <script type="text/python" src="app://py/brightness.py"></script>

    <script>

      window.addEvent('load', function() {

        var init_value = window.get_brightness();

        var init = false;

        var slider = $('ctrl');

        $('show_value').set('text', init_value + ' %');

          new Slider(slider, slider.getElement('.knob'), {

          range: [20, 101],

          initialStep: init_value,

          onChange: function(value) {

            $('show_value').set('text', value + ' %');

          },

          onComplete: function(value){

            if(!init) {

              init = true;

            }

            else {

              window.set_brightness(value);

            }

          }

        });

      })

    </script>

  </body>

</html>
Actually it is very simple, it just have a slider component which will act as the brightness controller, a paragraph which will contain the current brightness value and some scripts. I used mootools to bring to life my slider but clearly you can use your preferred framework or vanilla js. I omit here the css used to style the text and the slider.
One important point here. Do not follow the instructions to include a python script that you find in the official documentation because they do not work! Really! (And with this tideSDK already lost my trust), instead include an external file the way you see in this snippet:
<script type="text/python" src="app://path/to/script/from/Resources/folder"></script>
The paths are expressed relatively to the Resources folder that tideSDK creates for you when you start a new project.
The "magic" here happens because the javascript code and the python code can speak each other. My python code stays inside the py/brightness.py file:
#!/usr/bin/env python

import os

import sys

from subprocess import call, check_output


def get_brightness():

  brightness = check_output(["xbacklight", "-get"])

  return int(float(brightness))


def set_brightness(value):

  result = call(["xbacklight", "-set", value])


window.get_brightness = get_brightness

window.set_brightness = set_brightness
Returning to the index.html file you see that first I load the python code, which defines two functions, the first to get the actual brightness value and the second to set it. Such functions are then exposed to javascript by setting them as properties of the window object, as you see in the last two lines of the script.
Then the javascript which is loaded after can use this two functions to retrieve and set the brightness value selected with the slider.
The only thing which remains to do is to set some application preferences, you may check the file tiapp.xml which is quite self-explanatory and set your preferred values. For example I fixed the window dimensions preventing the user to resize it.
The final result:
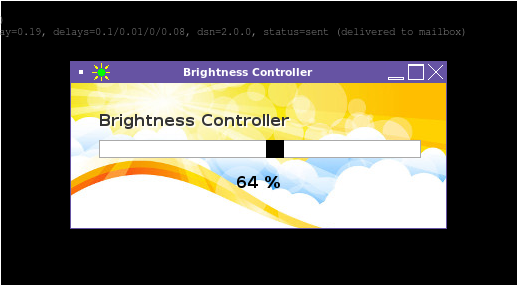
That's all, now I've my 25Mb brightness controller widget, yes I'm not kidding you, 25Mb!
But it was funny.
Your Smartwatch Loves Tasker!

Your Smartwatch Loves Tasker!
Featured
Django admin and bootstrap 5
Bootstrap 5 has come, currently in beta release, and seems already very stable.
So the question is: are you looking for ...
About code optimization, learn from exercises
Let's see an example of exercise you can face during a job interview, and let's use it to understand some ...

Notes on the Pearson correlation coefficient
The Pearson correlation coefficient is a measure of the linear correlation between two variables X and Y. It has a ...
Archive
- 2021
- 2020
- 2019
- 2018
- 2017
- Nov
- Oct
- Aug
- Jun
- Mar
- Feb
- 2016
- Oct
- Jun
- May
- Apr
- Mar
- Feb
- Jan
- 2015
- Nov
- Oct
- Aug
- Apr
- Mar
- Feb
- Jan
- 2014
- Sep
- Jul
- May
- Apr
- Mar
- Feb
- Jan
- 2013
- Nov
- Oct
- Sep
- Aug
- Jul
- Jun
- May
- Apr
- Mar
- Feb
- Jan
- 2012
- Dec
- Nov
- Oct
- Aug
- Jul
- Jun
- May
- Apr
- Jan
- 2011
- Dec
- Nov
- Oct
- Sep
- Aug
- Jul
- Jun
- May