Otto Backup, a friendly rsnapshot GUI application
You can also be interested in:
Every developer have to deal with backups. In the linux world the most used tool is probably rsync, and often it is run through rsnapshot, which lets you create incremental snapshots of your directories.
Almost any developer will not have any problems configuring and running rsnapshot through the command line and add it to the crontab schedule, but what if one of your clients asks for a way to download manually a backup of their application?
You could solve this by open an ftp area and letting them download some stuff, but what if such stuff is huge (GB of data)? Then the incremental option is probably the only one to consider.
For all these reasons I've created, for my company, a simple GUI which let's you run rsnapshot with ease. All you need to do is configure rsnapshot for your clients, configure OttoBackup to run the produced configuration file and they will be able to make a backup with just pressing a big button (something that almost every person can do).
So let me introduce you Otto Backup.
Otto Backup
Repository: https://github.com/otto-torino/OttoBackup
Otto Backup is a python Qt5 application which runs on linux, OSX and Windows platforms. It acts as a GUI for rsnapshot which allows an unexperienced user to manage an incremental backup through rsnapshot.
Otto Backup comes as a python PyQt5 application, but also includes a Mac OSX app which can be run without interpreter.
I've not done it, but from the same code base it is possible to create also a windows executable using pyinstaller (the tool I used to package the osx app).
Otto Backup requires rsnapshot binary, obviously, and also requires rsync to work through ssh key, because it doesn't let you interact with rsnapshot command, but just displays its output in a text field.
I'll discuss here how to install and configure OttoBackup in OSX, for linux systems it's similar, but easier.
Prerequisites
Otto Backup requires some tools, and such tools can be installed with ease through Homebrew.
So, first: install Homebrew:
$ /usr/bin/ruby -e "$(curl -fsSL https://raw.githubusercontent.com/Homebrew/install/master/install)"
Then we can use it to install rsnapshot and coreutils. The latter must be installed in order to get a cp command with the same options as the linux one (in particular the l option)!
$ brew install rsnapshot
$ brew install coreutils
Ok now you have all the required packages installed.
As said Otto Backup rsnapshot must be run through ssh and authentication must be provided with a key, so let's generate a key:
$ ssh-keygen -t rsa
Hit enter when it asks you for a passphrase (in other words, do not set a passphrase)
Now get your id_rsa.pub generated key and associate it to the remote user which you will use to run the backup.
If you configure all this stuff for one of your clients, you probably don't want to give them access to a shell, and you probably don't want to let them surf through your server's directories through ssh, so, even if not mandatory, it is better to limit the set of commands the backup user can perform, or better, to enable only the rsync command for that user!
In order to achieve this, you can use the command option in the authorize_keys file on the remote server, for example, you can add this entry:
command="/usr/bin/rsync-check.sh" ssh-rsa [THE KEY HERE]
where rsync-check.sh is a script which checks the input command and verifies if the user can run it or no:
#!/bin/sh
#
# this checks that rsync was the only command called
# TODO: check also shell substitution
#echo "SSH_ORIGINAL_COMMAND: $SSH_ORIGINAL_COMMAND"
case "$SSH_ORIGINAL_COMMAND" in
        *\&*)
                echo "Rejected 1"
                ;;
        *\;*)
                echo "Rejected 2"
                ;;
        rsync*)
                $SSH_ORIGINAL_COMMAND
                ;;
        *true*)
                echo $SSH_ORIGINAL_COMMAND
                ;;
        *)
                echo "Rejected 3"
                ;;
esac
Credits to gipi: https://github.com/gipi/Easy-backup/blob/master/bin/rsync-checker.sh
N.B. Do not forget to configure rsnapshot in order to use your private ssh key! On a Mac double check the commands paths inside the rsnapshot configuration file, also don't forget to set the cp command path to the one installed by coreutils!
Execute Otto Backup
Now you can run Otto Backup. You can execute it through the python interpreter >= 2.7 (make sure to have the PyQt5 lib installed), or run the OSX application provided.
At the first access you'll need to configure Otto Backup:
- rsnapshot binary path: you have to select the rsnapshot binary because an absolute path is required when running the packaged application
- rsnapshot config path: the path to the configuration file used
- first rsnapshot interval: which is the first interval in your configuration file? This is used to store the timestamp of the last backup operation, since only the first interval causes the remote files to be fetched!
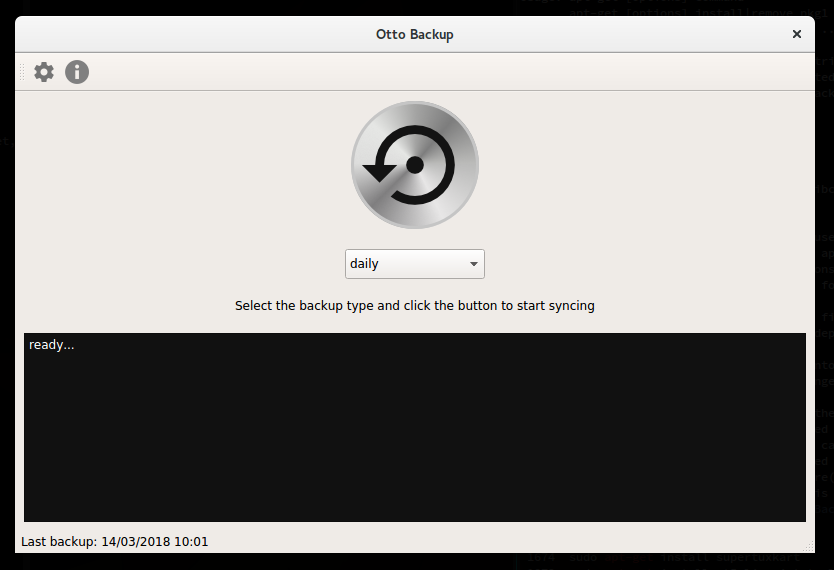
Otto Backup let's you choose between daily, weekly and monthly, while hourly is not supported, so make sure to comment out its line in the configuration file.
Now you can run your backup, just select the interval and press the button!
You needed to configure some stuff in order to make it work, I know. But you need to perform this operations only once, then your client can get a new backup just by pressing a huge button.
Your Smartwatch Loves Tasker!

Your Smartwatch Loves Tasker!
Featured
Django admin and bootstrap 5
Bootstrap 5 has come, currently in beta release, and seems already very stable.
So the question is: are you looking for ...

About code optimization, learn from exercises
Let's see an example of exercise you can face during a job interview, and let's use it to understand some ...

Notes on the Pearson correlation coefficient
The Pearson correlation coefficient is a measure of the linear correlation between two variables X and Y. It has a ...
Archive
- 2021
- 2020
- 2019
- 2018
- 2017
- Nov
- Oct
- Aug
- Jun
- Mar
- Feb
- 2016
- Oct
- Jun
- May
- Apr
- Mar
- Feb
- Jan
- 2015
- Nov
- Oct
- Aug
- Apr
- Mar
- Feb
- Jan
- 2014
- Sep
- Jul
- May
- Apr
- Mar
- Feb
- Jan
- 2013
- Nov
- Oct
- Sep
- Aug
- Jul
- Jun
- May
- Apr
- Mar
- Feb
- Jan
- 2012
- Dec
- Nov
- Oct
- Aug
- Jul
- Jun
- May
- Apr
- Jan
- 2011
- Dec
- Nov
- Oct
- Sep
- Aug
- Jul
- Jun
- May